Previous Post:
BOAT RESCUE PART 8: FIRE IN THE HOLD .... well, in the garage anyway
The last few weeks many projects have been started, but nothing is getting finished as I source, order, and wait for parts I think I need ... only to discover by the time they arrive I've had a better idea and need to re-order!
First on the list was to get the engine into the boat. This was easy: just pull the trailer out of the shed, hoist the engine up to the shed rafters (on a reinforced arch), back the boat into the shed, and lower the engine down.
 |
| Yanmar dangling over the cockpit. |
This was as good a time as any to refurbish the engine beds. When a P.O. (previous owner) had the Volvo-to-Yanmar conversion done some wooden shims were used to get the correct engine height. This served well for the time it was used but, having the luxury of unlimited time, a more permanent set of shims was made from 1/2" aluminum plate, and the mounts re-drilled, re-tapped, and installed.
 |
| Engine beds installed. |
Using a beam across the companionway entrance the engine was hoisted down to the new beds and loosely bolted down.
 |
| Engine in. |
I've decided to use a Volvo Penta dripless shaft seal. They are very simple (good) and have a stellar reputation (better). However, the shaft tube had been fiberglassed in leaving only about an inch protruding; not enough for the Volvo Penta clamping system.
As there was a surplus of material around the tube it was a simple matter to remove enough to fit the clamp, only to find the tube had a smaller diameter where it was newly exposed.
 |
| Tube revealed. |
A plastic collar was made up ...
 |
| Plastic collar & clamp ready for epoxy fill. |
... filled with thickened epoxy and clamped tight.
 |
| Plastic and clamp removed ... |
 |
| ... and formed to match steel portion of tube. |
After sanding everything smooth the new seal fits perfectly.
 |
| Volvo Penta shaft seal. |
Another little project started is thru-hull and seacock installation. After searching for the proper cutting tool for flush thru-hull installation and coming up empty handed, the existing holes (too small) were enlarged carefully with a semi-round wood rasp and re-formed using thicked epoxy, pressing the new thru-hulls in (coated with release wax) to form a perfect fit.
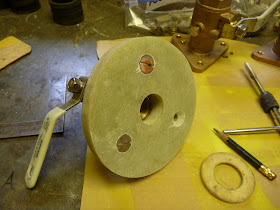
I decided to seat the seacocks on a fiberglass pad, rather than a wooden one, because .... just because! The pads were made from a sheet of fiberglass, made from layers of
NEMPC and polyester rein.
NEMPC is a fibreglass composite composed of 17 oz. biaxial unwoven roving stitched fabric incorporating a 3/4 oz. chopped strand mat stitched to one side of the fabric. It took 12 layers to lay up a 5/8" thick sheet on a piece of heavy window glass (to keep it perfectly flat). This was my first attempt at laminating, and it turned out quite well. The whole job only took an hour!
 |
| 5/8" thick fiberglass sheet. |
Cutting it required using the table saw with an old blade, nibbling it close to shape, then using a large sanding disk to finish it off and a router to round the edges. A hole saw was used to bore the thru-hull holes. Needless to say, I wore dust protection for lungs, eyes, and skin.
 |
| Roughing out the blocks. |
On this boat I decided to use
Groco's (the thru-hull manufacturer) alternate method. Rather than drill more holes through the hull, I have drilled, countersunk, and tapped holes for the 5/16" silicone bronze machine screws (still in transit) and will thread them up from the bottom of the pads, setting the pads onto the hull with a generous layer of thickened epoxy to fill any gaps and bond them to the hull.
 |
| Underside of block, to be bonded to inside of hull. |
The clamping pressure between the thru-hull and the seacock is sufficient to hold the works together, especially as the bonded fiberglass block is not prone to shrinkage and movement as a wooden one is.
If, in the distant future, the bolts fail, then the valve can be turned a few degrees, and new holes drilled right through the block and hull.
Now, if only those machine screws would arrive ......
Coming next: align the engine, attach the exhaust, cooling water lines, and fuel lines. Find the best places for raw water strainer, fuel filter, and the routing of lines under the cockpit floor.
Next: BOAT RESCUE PART 10: INTERIOR WORK STARTS IN ERNEST.


Hi,
ReplyDeleteI am following your restoration on a regular base. I also made a link from my website to yours, since I feel it's quite impressive what you're doing here! Just question; why are you choosing for this construction with the backing plates for your thru jul fittings. I mean, what is the advantage above the standard construction?
Beste regards,
Frans van der Wel
Aewmilia III
aemilia.org