Previous:
BOAT RESCUE PART 4: LET THE RESTORATION BEGIN
As you can see by the picture below, Bennath's hull is now free of all the old bottom paint, and since the photo was taken she has lost the blue beltline stripe as well.
 |
| Naked hull. |
Time to start the layout for new bulkhead panels. As I could not get 15mm plywood I used 3/4" instead ... a little heavier maybe, but one has to go with what's available.
 |
| Maximizing wood use. |
One bulkhead was too large to get through the hatch, so it had to be cut in two. The new one was also made in two pieces, with a joint 12" in from the inboard edge. This allows the part that bolts to the hull flange to remain in one piece. The two will have to be joined inside the boat.
 |
| Main bulkhead joint with joiner strip. (Final strip used was plywood as the grain of the solid wood strip lacked strength.) |
With the bulkheads held in by a few fasteners, the old (cleaned) settees were installed and checked for fit. !/8" had to be taken off the length between bulkheads to compensate for the thicker plywood.
 |
| Old stuff back in ... but not for long! |
Under the settees are two drawers (bins) and a double sliding door for under-settee access. The drawer supports were made a bit stronger than the originals, which were made from 1/8" plywood and battens.
 |
| Drawer supports. |
 |
| Sliding doors. |
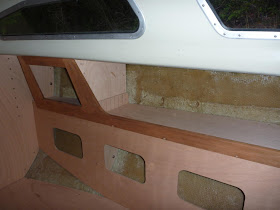
The trim over the settees was sanded to bare wood and repaired.
 |
| Starboard settee back and shelves. |
Fortunately I have a good stock of some South American Redwood that is a very close match to the original mahogany trim. This material was used to make packing crates when our family moved up to Canada in 1961. It is quite hard, but easy to machine, takes screws and glue well, and is almost a perfect match to the old stuff,
 |
| Ancient wood from packing crates cut into trim pieces. |
The nav station was dismantled, the solid mahogany cleaned up by taking a light pass through the planer, and re-assembled. A new plywood top was made too.
 |
| Refurbished nav station. |
Next came the galley, which is still underway. It seems the smallest areas (galley and head) take the most time. Nothing about boats is square or level, so to get things to line up better I re-leveled the boat using a transit, so that the water line sits level from stem to stern, and port to starboard. I found this really helped to reconstruct some pieces that had disintegrated on removal and so were useless as patterns.
 |
| Parts of old galley and some "new" pattern pieces. |
 |
| Old galley rough-in. |
After much noodling the patterns finally fell into place and work has started on the new galley bulkheads.
 |
| Back side of forward galley bulkhead. |
The original aft galley bulkhead was made in two pieces: one upper and one lower. The upper and lower parts overlapped a few inches and were pretty wobbly. I can see why it was made that way, as the cabinet with sink and ice box was made all in one piece, and would not have fitted through the hatch if the bulkhead portion was included.
I made mine in one piece, and will build the cabinet in sections, doing final assembly in the boat.
 |
| One-piece aft galley bulkhead. |
Originally there was an oven in the galley, but this was removed and a cabinet installed with a Taylor kerosene two-burner cook top. I plan to drop in my Origo 3000 cooktop from the Vega, and sit it in a new cabinet forward of the ice box. Below the stove will be one or two storage areas (like the Vega) either shelves or bins, that can be easily removed to replace the stove with a gimbaled stove/oven combination such as the
Origo 6000.
 |
| Origo 3000 in the Vega. |
The boat shed has been a great working area, as the PNW wet weather has returned. Pictured below are tomorrow's projects waiting for attention.
 |
| Next in line: Cockpit locker partitions. |
Oh yes, and we do go sailing occasionally too!
 |
| Anchored in Sequim Bay, on the way to Port Townsend. |
Next:
BOAT RESCUE PART 6: INTERIOR REBUILD CONTINUES, ENGINE EXAMINED..


No comments:
Post a Comment